Monday, March 31, 2014

Layers and comfort

Hello dear readers,  It's been a day or two... ok a few weeks since I've done a fashion post.  I am in love with this outfit.  It was a cold day here in Utah so I wanted to be warm, and comfortable since we were taking the kids to a fun museum.  So I walked into my closet and threw on this long tunic, and because I didn't want to be lugging every ones coats around... mine included I threw on my roses sweater.  And guess what?!!  My hair definitely needed to be washed, but I was being lazy, and didn't feel like it, so I threw on this off white lace head wrap.  I had a black one once upon a time that would've been a great contrast against my white hair, but things get lost when I have two little monstri who like to play in mommy's things lol. (If you have lazy days and don't want to wash your hair, hats and head wraps are a must have in your closet) I just added some jewels, and a light pink lip.  I thought my pink and red bag would go quite nicely with the roses and opted to go with my booties for the first half of the day, and then my fuzzy boots took over.  I hope you enjoy the look.  HUGS  XXXXxxxxXXXXXxxXXx
                                                                                                Jaimey
P.S.  If you haven't entered the Red Earth Trading Co. giveaway, don't forget that it ends on Thursday!!!!  If you missed the post you can read about it here


Lace Head wrap: Rue21
Rose sweater: Forever21
Black tunic: H&M
Fleece Lined leggings: Steve Madden
Booties: Justfab
Bag: Dana Buchman
Jewels: Forever21
Lipstick: Revlon pink sky line


Friday, March 28, 2014

Red Earth Trading Co.

I have another amazing company featured on the blog today!  I am so excited to inform you guys about their mission and expose their beautiful and unique products to you all.  Keep reading to see how this company supports artisans in Uganda and Kenya and how it gives back  to community development work.

In 2010, Travis who is the founder of Red Earth Trading Co.  was working in East Africa.  He noticed that regardless of the social classes among the natives, they all shared a common goal:  Survival.  Tourism is a huge part of Africa's income, so many of the artisans' livelihood is dependent on tourists.  Travis saw how he could help artisans grow beyond their local market and contribute in helping them have a more secure income.  For the previous six years, Travis had also been working on ways to sustain the community development work.  The creation of Red Earth Trading Co. allowed both of Travis' goals to be attained.

Red Earth Trading Co. creates hope, and opportunities through trade and business.  It is also involved with supporting non-profit organizations in East Africa by donating 5% of each sale. Red Earth Trading Co. has teamed up with artisans in Uganda and Kenya to provide fashionable, unique, and beautiful handcrafted jewelry, accessories, AND home goods.

Red Earth Trading Co. is also involved in the Know Think Act, which helps empower local leaders by helping to end poverty in their communities.  You can read more about it here.  Red Earth Trading Co. recognizes that the small businesses in Uganda and Kenya are what keeps families out of poverty and helps build their economy. Their support for their artisans extends to helping them manage their business in a variety of markets.

It's an amazing company that provides so many opportunities to help the people of Uganda and Kenya rise from poverty and have a healthy, happy, successful life.  To read more about Red Earth Trading Co. and their story please visit their website.

Red Earth Trading Co. has been generous enough to provide you the opportunity to win one of their most sought after necklaces.  The simple stag pendent necklace which is valued at $50.  This necklace is so beautiful and unique.  It is definitely an attention grabbing accessory, and is also a very versatile piece.  I think it would fit in with any style type.  Below are a few shots of the beautiful piece.


***GIVEAWAY CLOSED***
Giveaway Rules!!!
Giveaway will close Thursday April 3, 2014 at 11:00 PM MST.  Winner will be randomly chosen and announced on Friday's inspirational post.

This giveaway is opened to EVERYONE in the US.
Please follow Red Earth Trading Co. on instagram (REDEARTHTRADE) OR their facebook page
follow me on insta (jaimeytripp) OR subscribe to my blog
***For an extra entry go to my instagram page (jaimeytripp) and tag at least two friends.***

Please comment on my blog letting me know how you entered.   
Good Luck to you all!  
Don't forget to check out Red Earth Trading Co. website. They have such a variety of things and it is all so beautiful and unique!

Hugs XXXxxxxXXXX
                                    Jaimey


Tuesday, March 25, 2014

Flower Arranging

Hey all
I wanted to share a little DIY project that takes 10-15 mins and can be as expensive as you'd like it to be.  I don't know if I should call it "Flower Arranging", because all that I am doing is purchasing flowers and cutting them to the heights that I prefer... I guess I can pretend to be a florist for a day:)  I am obsessed with having fresh flowers around my house.  They are so beautiful and enjoyable, and for some silly reason, make me so happy when I see them.  I think they make the house fill warm and cozy, and it's a memory I want my children to have.  Their mama always having fresh flowers in their home.  I'm warning you there are lots of pics, because I chose to do two different arrangements.  Just a heads up! (And just because of the way the pics are taken, the first three images will be smaller, the sidebar images overlap onto the images)


Alright, first and funnest step: Decide which flower(s) you'd like
to have.  I am obsessed with roses, so they are and will always
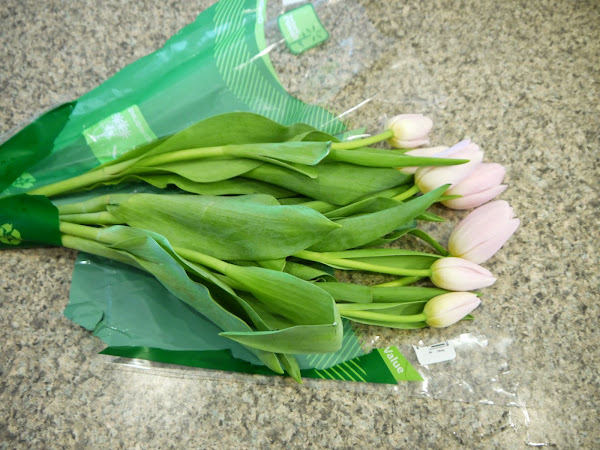
be my go to flower.  I also chose some light pink tulips.  Such a perfect 
spring flower.  (I got both bouquets of flowers from walmart.  It is definitely
a hit or miss, so when they have a fresh selection, I stock up.  Otherwise I 
head on over to costco.  Roses were $10, and tulips were $5)
You'll need flowers (obviously), vase(s), mason jars, 
wine bottles, anything that will hold the flowers, and scissors

I don't like my flowers to be towering over the vases, so I cut my 
flowers so they are a few inches out from the top of the vase.  
I also don't fill my vase up with water until after all my flowers
have been cut, that way I don't continually have water flying out
with the flower when I am pulling it out of the vase and putting it back in.

Less is more, so if this is your first time doing this, only cut small
sections of the stem off at a time.  Cut, place in vase, and repeat if needed.
Remember to cut stems on an angle

After I am satisfied with the height of the flower, I remove 
unwanted leaves.

I only remove the lower leaves from the steam.  I always
leave the top leaves alone.  Unless the top leaves are in the 
middle of the stem... then I cut them off.  I've found that if I leave
all the leaves on, the flowers get really crowded, and it doesn't
look as pretty.

When I finish with the first flower, I measure the other flowers
to the first flowers length.  That way they will all be around the same
height.  

Fill the vase with water and add the flower food.  
I read in Better Homes and Gardens one time, that if
you added a penny to a vase of flowers, then they last longer.
I have yet to try this.  

I love how stems look in the clear water.  Weird I know
but it is one of the reasons why I love having flowers.

Pretty!!!

Now on to the tulips!

I don't mind if the tulips tower over the vase.  I think it looks
pretty when they are all flopping over the edge instead of
all perfectly upright.  It just seems more natural to me.
So I don't cut as much off the stem as I do with the roses

Compare the length of the stems to each other, so they
will be more or less even

Careful with tulip stems!  They are extremely fragile.  As I was pulling
a mangled leaf from the stem, I broke the stem in half.  Instead
of pulling leaves from tulip stems, I would just cut as close to the place where
the stem and leaf meet.

I still used the broken flower, I just cut off the jagged edge 
to make it even

And tucked it in among the other tulips where it can be
supported.  You will just have to remember to watch the
water level and make sure that this little flowers' stem is 
always submerged in water

I always save the clear wrapper that the flowers come in.  That way
when I am all through with the stem cutting and leaf removal, I throw
everything all on the wrapper, wrap it up and throw it away in just one
step.  

And here you go.  Two totally different looks. 
Which is your favorite?
I hope you enjoyed the DIY tutorial.  If you are going
to be doing an arrangement anytime soon, upload it to 
instagram and tag me (@jaimeytripp)  I would LOVE to 
see how it/they turn out.  
Lots of Hugs XXXxxxXXXxxx
Jaimey


Friday, March 21, 2014

Remember? You have a filter!

****Congratulations to DEBRA CARLSON!  You are the winner for the Tukula Giveaway.  Contact me and let me know which accessory you would like.  If you weren't a winner this time don't worry there will be another giveaway soon!!!****

Remember when I talked about self reflection?  If you forgot or missed it you can check the post out here. I'll be referencing one of those books on that "Recommendation List."  As I was doing some self reflection, I came across a quote that I clearly needed to read.  

                                                                  "The Real art of conversation 
                                                               is not only to say the right thing
                                                               at the right place but to leave
                                                               unsaid the wrong thing at the 
                                                               tempting moment."
                                         --Dorothy Nevill


                         Volume Four: Thoughts for one hundred days (50)
                                                                     By: Richard L Evans

As you can guess, this incident happened to me this last week.  I was having a conversation with family, and I don't know what came over me during that moment, but I just said what I was thinking.  After I said what I did I realized how mean and negative it sounded.  I apologized for the comment that was said, but I still felt class-less and like a bully for my comment. 

There was a story I read once about someone (person A) handing someone else (person B) a plate.  Person A told person B to throw the plate as hard as they could.  The plate shattered into tons of pieces.  Person A then told person B to say, "I'm Sorry" to the plate.  Person B did, but the plate still stayed shattered.

What I'm trying to say, is even when we mess up and say unkind comments and realize it and apologize, like that plate those words can't be taken back and fix what was said.  So remember how damaging words can be and try to refrain from speaking unkind and negative words. 

"For beautiful Eyes, look for the good 
in others; for BEAUTIFUL LIPS, SPEAK 
ONLY WORDS OF KINDNESS; and for

poise, walk with the knowledge that
you are never alone."
                            --Audrey Hepburn

Best of luck.  Hugs XXXX
                                        Jaimey


Wednesday, March 19, 2014

Lemon & Ginger Honey Tea

***Just a friendly reminder that the Tukula GIVEAWAY ends TOMORROW 3/20/14 at 10pm MST.  If you missed the post you can read about it here.  P.S. Friends and Family even though you know me, you are more then welcome to enter the giveaway.  It is randomly picked so everyone has a fair chance at winning****

Well the Tripp Family seems to be down this week with a nasty Spring cold.  I hate being sick, I think as a parent you should be exempt from sicknesses.  When I was pregnant with Lilah I had a really bad head cold. I called the baby line to see if there was anything safe I could take to relieve the symptoms.  I asked specifically about Air-borne.  The lady told me I couldn't take anything but the thing that really helps get over a cold is an extra hour of sleep everyday.  Uh.... Ya right.  I have a toddler and getting sleep is already hard enough.  Now that I have two toddlers, I'm not even going to try.  So all you mommy's out there who get colds and are not able to get extra hours of sleep each day, here is a little something that may just help you.

I love drinking this tea.  It warms me up when I have the chills, and soothes sore throats, and runny noses. For a little while anyway.  But hey, any relief is better than no relief right?  I know tea is not every one's thing, but please just try this little recipe I've created.  Ok?!  It doesn't taste like dirty water, or tree bark water lol. Although, I can't honestly say I've tried those... to me this tastes a little like sweetened warm/hot lemonade.


Here are the main ingredients you'll need.
Twinings Lemon & Ginger tea is what I use.  (From Wal-mart)
Raw honey:  You should research the benefits of Raw honeyvs. regular honey.  I like raw honey, but if 
you don't just use regular.
Lemons: Rich in Vitamin C, and helps flush toxins from the body. Not to mention
that the smell of citrus helps give you a boost in energy.

Boil some water on the stove.  Preferably in a teapot, since that's why they were created.... But if 
you don't have one like I obviously do not, then boil water in a saucepan.  I don't technically boil
 the water.  I just watch for steam to start forming and then I call it good.  While you're waiting, 
cut the lemon in half and remove the seeds from one of the halves.

Pour the boiled water into a mug or teacup.  This is my Royal Albert mug.  I am obsessed with it!
It's from amazon if you're wondering.  Add the tea bag to the boiled water and let steep 3-5 mins.
Remember the longer it steeps the stronger it'll be.

Remove the teabag from the tea  Squeeze some of that yummy lemon into the lemon & ginger tea...
I use about half of a lemon.  But, if this is your first time, less is more.  You don't want it to be too 
sour.  (don't forget to remove the lemon seeds or you'll be fishing them out, and that is annoying.)

Add the honey to the tea.  I am just guessing here, but I use about a tsp of honey give or take.
Start with less and then add more,  once you've done this a few times you just sort of guesstimate.  
Sorry I don't know the exact measurements.

Stir it all together and enjoy your delicious lemon & ginger honey tea.
What do you guys think???

Hope you get feeling better soon!
Hugs XXX 
             Jaimey


Monday, March 17, 2014

Hearts n' leather

Hey friends,
I have to say that I love the transition between seasons in Utah.  The temperature is so different everyday, which allows me to wear sweaters one day and tees the next.  I love variety.  For my outfit since it was a cooler day, I decided to get some use out of my leather shorts.  I love this shorts.  Tyler.... not so much, but lucky for me he supports me in all my clothing experiments lol.  I put on fleece lined leggings under the shorts so that I would stay nice and warm.  I think this helps add some texture.  Then I threw on a flirty heart sweater.  I didn't want to wear heels with this outfit, I wanted it to be more laid back and chill, so I downplayed it by putting on my wedge sneakers.  Such an essential in my closet.  I added some jewels, and a pink lip and called it good.  Hope you like the look.  Hugs XXXX
                                                                                                  Jaimey

P.s. Don't forget to enter the giveaway sponsored by Tukula.  If you missed it, check out the post here.


Bag: H&M
Sweater: Target
Leather Shorts: Forever21
Leggings: Steve Madden
Black & Gold Bracelets: Forever21
Gold Spiked Bracelet: H&M
Leather lock Cuff: Charlotte Russe
Bow-Tie Necklace: Charlotte Russe
Sunnies: Charming Charlies
Sneakers: Sketchers